Pages

Monday, 3 March 2014

Oscar De La Pala'


There's no denying that pale skin on the red carpet gives instant sophistication. Whilst there wasn't any super pale looks seen as recent awards ceremonies, I did noticed a definite steer away from super full on tans. The tans are getting increasingly fairer, almost to look natural and those who are naturally fair are getting ever more confident in showing it. 

Whilst the photography is a little misleading (making her look slightly more tanned than what she is), Cate Blanchett looked truelly effortless in her nude coloured gown. Cate is a great example of a pale/pink undertone, and her skin up close is absolutely flawless, even when wearing no make up.
 

It was also refreshing to see pale skin paired against deep blue, as demonstrated by Amy Adams. The rest of the look was quite paired back, but again the colour although it was bold - didn't work against her fair skin, infact allowed it to be contrasted beautifully.

What is refreshing with these ladies, is they are a true example that you can be successful and equally beautiful, whilst remaining true to your natural skin tone. It's the personality and true elegance that shines through with these ladies, and not the "glow" of the bronzing products, proving that you can rock a red carpet, yes even with pale skin.


And no red carpet look would be complete without make up right?! Above are what I'd pick for an ultra glamorous look. My Oscars invite seemed to have got lost in the post this year, but if I wanted a glam look then these are the types of products I would go for. For my base, I would use Porcelain foundation in Bobbi Brown (one of the palest high end colours available), and the new lancome concealer palette which is ultra pale and mixable (hurray!). I would complete my look with a brown smokey eye, and red Tom Ford Lips.

What looks did you like from this years Oscars, and what make up would you wear for a glamorous event?! Leave me a comment below, and don't forget to follow me on twitter/instagram @paleskinmakeup 

Friday, 21 February 2014

New Skincare Goodies!


You would be forgiven for thinking this blog is turning into a skincare and not a make-up blog as of late. Well the saying "You can't have great make-up without great skincare", is definitely something I am conscious of. I have really been getting into my skincare in the last few months, and it's showing amazing benefits I never thought possible with my skin! 

As I have mentioned before, my skin is quite dry/sensitive yet blemish prone. The products in my current rotation include... Liz Earle Cleanse and Polish, Hydraluron, Pixi Glow Tonic and La Roche Posay Effaclar K Moisturiser. All of these are working beautifully, although there is always room for more! The following 3 items are things I have picked up recently.....

1. Garnier Micellar Cleansing Water 400ml - £3.32 (Superdrug)

Make Up remover is extremely important, particularly if you wear heavy foundation or anything capable of clogging the pores if it's not cleaned off properly. Prior to cleansing in the evening, I always remove make up beforehand and this new one from Garnier caught my eye in Superdrug the other day.

I'm still in the early days of using this, but so far it seems to remove make up quite effectively, when used in conjuction with a Muslin Cloth. It claims one bottle will give you 400 uses.... I'll keep you posted on that! ;)

2. The Body Shop Muslin Cloth - £2.50


Anyone who has seen my collection of Liz Earle cloths would know I am pretty loyal to the brand and have been using them for many years now. However, upon finding out The Body Shop also stock them, I was intrigued to compare the difference. 

I have noticed so far that the Liz Earle ones are perhaps slightly softer, although I will have to see how it washes up as I have a feeling The Body Shop one feels slightly courser because it hasn't been washed yet. It does however remove make-up just as well, and isn't harsh on the skin.

3. N-spa Brightening Detox Scrub -  £4.50 (or 3 for £10 at Asda)


Fancy putting amazing skincare lines on offer whilst doing your weekly shop... I have enough trouble staying away from the doughnuts on the bakery aisle!!

This is the item I am most excited to talk about, as N-spa are a brand I have wanted to try for ages now. I picked up the scrub as coming through winter is tough on skin, and I felt as if I was in need of some exfoliation to help my skin regenerate and look it's best. 

I have used this a few times, in with my skincare routine after cleanser and before toner/serum/moisturiser. It is truelly heavenly when used in this order and at night before bed. It is very gentle on the skin, and the particles are quite fine so it's quite difficult to over scrub or cause irritation. It exudes a really calming, relaxing scent that *definitely* helps to make me fall asleep faster. 

When I wake up, my skin feels lovely and soft and it's a really effective overall product. Great for sensitive skins, and I would say use this one/twice weekly in with your skincare routine. I didn't think I would be this obsessed with this product, but I really am!


Monday, 27 January 2014

Kel Loved Orange Soda... And I Love Orange Glow Tonic!


Most people make new years resolutions to quit chocolate or join the gym. Mine was to get better looking skin, and figure out exactly what I needed to do in order to achieve this. For me, I felt like investing my time into researching skincare options was the way forward, as past dietary changes and following other standard advice gave me no change in the look of my skin.

My skin is quite dry and sensitive, and so every toner I've ever used has left my skin feeling dry, tight, irritated, red etc.  For many years I have skipped the toner stage of my skincare routine, simply because my skin just couldn't handle it.

It was Caroline Hiron's blog that led me to discover Pixi Glow Tonic - a product that has been talked about almost to death by bloggers and skincare experts alike. Infact, it's only made in relatively small batches and when it's announced as being in stock - it very quickly sells out. 

I was dubious to try glow tonic because as we all know, products are easily over-hyped in the beauty world. However, it helped reassure me when Caroline (an actual skincare expert) mentioned it on her blog, stating it was a dupe of a more expensive product called P50. 

As I have mentioned before, I now use use La Roche Posay Effaclar K moisturiser, as well as my Liz Earle Cleanse and Polish. I feel both of these products have been working great, however I wanted a product that would improve my skins texture and reduce the look of my pores.

The beauty of Glow Tonic, is that it is actually an exfoliating toner as it contains Glycolic Acid. This ingredient helps the skin to renew itself, in a way that is different from using a scrub that contains exfoliating particles. Frankly, exfoliating is something I rarely do because of how red and irrated even the gentlest of exfoliators leaves my skin feeling.

I added Glow Tonic as my second step after Cleanse & Polish, using a large cotton pad and sweeping the Glow Tonic all over the face. The smell is not what you would expect, and I liken it to the smell of soaps in posh hotel bathrooms. It's an odd one to explain, but definitely is a little strange, although not in any way unbearable. I left my judgement at the door though, because what's important is how well and if it works.

The first thing I looked out for was if it made my skin red, itchy or uncomfortable. I was worried this could be an issue as it contains Ginseng. I was relieved and surprised to find my skin felt completely normal and even somewhat refreshed after applying Glow Tonic. I of course followed up with Effaclar K, so I can't comment on how it would leave the skin feeling without moisturiser. 

I have been using Glow Tonic for about 4 weeks now, twice a day as part of my skincare routine. My skin is honestly looking the best it has ever looked, and the most noticeable thing is how smooth to the touch it feels, especially when I wake up in the morning after it's had time to work it's magic overnight. The look and feel is comparable to how my skin felt as a child, just pure smoothness. This is especially noticeable around the chin which has always been my most self concious area, and always where I apply the most make up!

Glow Tonic has also been really effective in getting rid of those pesky little bumps that aren't blemishes as such, but just annoying blips in the texture which prevent the skin from looking smooth.  I have also found I am needing increasingly less make-up, and have simply been using my Bobbi Brown tinted moisturiser, and a little concealer here and there.

There still is a way to go before I have the skin I want - completely free of marks etc, however for me *any* improvement is greatly welcomed, and for once I feel as if my money hasn't been wasted (Glow Tonic is £16 + postage unless you live in London and can pop into a Pixi store). 

If like me you have to be extremely careful with what you use on your skin, yet want to improve the texture and appearance then from my experience, Pixi Glow Tonic is something I would recommend. I really can't think of anything negative to say, other than it can be a difficult product to get hold of. However, I feel this in itself speaks volumes about the quality of the product and it's obviously working wonders for alot of people!

Closing statement? Believe the hype.


Monday, 20 January 2014

Make Up Colour Theory


A little while ago, I saw a video posted on into the gloss featuring MUA Robert Jones, discussing colour theory in make up in relation to skin tone. I found it incredibly useful, so thought I would write this post summarising the advice given to those of us with pale skin. 

It's important to remember that a product can look very different depending on the skin tone. If you really like the look of a product on a model with tanned/darker skin... remember it may not suit you if you have very fair skin, and vice versa. Also, don't just go for colours that you like as colours, i.e you'd love it as a wall or dress colour - always keep your skin tone in mind and what it can and cannot handle.

Never be afraid to experiment with make up choices, although I feel Robert's advice could save you money in the long run, and make sure you are getting the most out of the products you buy and they don't end up unloved and unused!

Blusher 

"It's not to contour or re-shape your face with, it's to add life and colour to your face. A great rule of thumb, is if you were to run around the block, you don't want to use a shade of blush any darker than what you would flush to".


DO: Go for softer colours such as pinks, peaches and apricot.

DON'T: Try to pull off something that's too dark for your skin tone.


Lips 

"Keep a few things in mind. Your lip size - that's always the most important to me because you never want to wear a shade that's dark if your lips are thin. A lighter shade will make them look fuller if they are thin. Secondly it is your skin tone - you want to choose something that is very complimentary to your skin tone. If you want to play it safe, you can always choose a shade a couple of shades darker than your natural skin tone. That will give you definition without it being too much".


DO: Although you can wear both, go for warm tones over cool tones, as these will make you look younger and add life to the face.

DON'T: Wear brown toned lipsticks, as these do not suit extremely pale skin tones. 


I hope the above advice from Robert helped! If you have any recommendations of products you use, then feel free to leave a comment below!


Monday, 13 January 2014

Mixing aint just for cocktails!


Let's be honest, the biggest pet peeve when it comes to buying foundation when you have pale skin, is finding shades that are light enough. 

Strictly speaking, there isn't an awful lot you can do to find *ultra* light shades (as in darker that white yet lighter than NC15 in Mac).  The best way you can make the most out of your makeup, and get away with wearing brands of foundations that do not make shades light enough for you - is to invest in a white foundation and get into custom mixing to your shade.

I have found the above foundations which are white or off white that you may want to look into.  


1. Barry M Foundation Creme in White - £3.99 (currently unavailable on the Barry M website but will I contact them to enquire when it's back!)

2. Mac Face and Body in white - £27

3. Stargazer foundation in White - £3.50 
I have also previously reviewed this product which you can read about here.

4. Illamasqua Rich Liquid Foundation in 100 Pure White - £25 Illamasqua are fantastic for catering for paler shades and also have other liquid and compact foundations in the same shade.

Yes, mixing means putting in a little more effort and spending cash on a white foundation, however if like me you have a drawer full of foundations that are too dark, then really it will mean you will actually get to use them, and they will go from looking orange to looking great! 

There is also a key problem to look out for that I feel many people neglect to notice, that mixing can drastically help with.
 

Tide Marks  (duh duh duhhhhh!)


When your foundation colour does not match the colour on your neck either because your shade is too dark or.....

When your foundation appears to be a perfect match when applying (in good daylight this is, not store lighting) yet when you look in the mirror some time later you notice it is distinctly darker, creating a contrast between the face and neck that wasn't there when you blended and checked for it earlier. 

The process is known as oxidisation - which is when oxygen reacts with the particles in your foundation which in short turns them darker. Some foundations do this much worse than others and can look considerably darker than when you first applied them. 

The best way to check for oxidisation within your current foundation is to swatch on your hand, leave it 10 minutes and swatch again next to it to see if there is much of a colour difference. If you are finding there is a difference, then be sure to mix your foundation with a white foundation before application to the face so it's *slightly* too pale. So long as you don't overdo the white, your mixed shade will then oxidise to your natural colour and nothing darker. 

This may be more of a trial and error thing for some of you, but once you get the hang of it, it will make a massive difference and greatly improve the look of your makeup. Remember: the wrong colour base looks great on no one!


I tend to mix on the back of my hand and at the minute I am using Bobbi Brown tinted moisturiser for my base, in "Alabaster Tint" with 1 pump of Dainty Doll in 001 as my mixer. However as Dainty Doll are no longer in business this is extremely difficult to find so I'd recommend buying one of the alternative ones pictured above.

To mix, I tend to place both shades side by side, and gently mix by hand. I wouldn't advise mixing with your foundation brush as in my experience, half of it ends up just caking up the brush and doesn't get mixed as well. 

Alternatively, you can get a small plastic lid to insert your products into, and use a thin brush to mix the two together. Although for accuracy, mixing on the hand gives you a better idea of your natural skintone (even if it's slightly different to to the colour of your face/neck).

My final word on mixing is once you get used to it, it really isn't much of a hassle and only really adds a few seconds onto the time it takes to apply your makeup. 

As always, daylight is your best friend trying to get the perfect shade, not artificial yellow light. Try and position your make up mirror so that it reflects lots of natural light, and is not facing away from it. 

Unfortunately when shopping for foundation, counter assistants will tell you the shade of foundation is perfect even when it's not not (do I need to remind anyone of when I was sold Estee Lauder Double Wear in Desert Beige?!) Always have your wits about you and don't be afraid to say no if you are not 100% comfortable on the shade, or wish to go outside and look at it in natural light. 

Oh... and don't forget to mix!


Sunday, 5 January 2014

Eff-ing Miracle


Some of you may remember that back in October I picked up a few items whilst in London, including the Origins "Make A Difference Plus" Moisturiser.  Despite being told by the counter assistant this was a "much less heavy/greasy formula than other moisturisers, and will definitely not break my skin out".... this moisturiser has done nothing but. Infact, my skin has been at it's worst for quite some time all since I started using this one product. 

Hence I was in need of an actual miracle. I promptly gave up with MADP two weeks ago after finally having enough and scoured the skincare section of Boots for a remedy. I have heard pretty much every beauty blogger mention "La Roche Posay" in their skincare favourites and recommendations, so decided to have a look and see if there was anything that may help.

To be honest the LRP stand in Boots was a little overwhelming as not only is the packaging in French, (GCSE Grade C will only get you so far...) but the titles of all the products sounded more like scientific experiments rather than skincare. I finally went with a moisturiser entitled "La Roche Posay Effaclar K", which cost  £9.75 for a 30ml tube. The product is boxed, and so this is what it looks like on the shelf...


The product itself comes in a squeezy metal tube, and is a thin white liquid. It has a very faint citrus smell, although is hardly noticeable at all and also smells quite clinical but in a good way. There's nothing worse that heavily scented skincare, and thankfully Effaclar K doesn't offend the senses in the slightest.

It is very quick to sink into the skin once applied and evenly distributed. Once it's absorbed, it does not sit on top of the skin like some moisturisers - instead the skin just feels soft - not wet, greasy or stingy. It also states it can be applied under makeup.

I wasn't really sure what to expect from this product, afterall it's a moisturiser - not a mask, cleanser, facial, toner, exfoliator or anything typically aimed at problem skin. So, I cleansed as normal that night with my Liz Earle Cleanse and Polish, and then applied this afterwards. 

The next morning I had a look in the mirror and had to do a double take. My skin actually looked different, noticably different. No it was not super clear with not a mark in sight - but it had definitely cleared up considerably in just a few hours with just one use! 

I have continued to apply this moisturiser day and night for almost two weeks now, and my skin has completely changed in texture and appearance. I do have a few marks/scars as pale skin shows up imperfections like nothing else it would seem. However, as this product doesn't state it is for fading marks or scars I feel it's not fair to mark it down on that. 

What it does claim, is that it "gradually exfoliates the skin texture to reduce pores and regain a smooth and clear complexion." In my opinion, I feel this product absolutely delivers on this promise and I have noticed a huge difference in just a short space of time.

The problem with breakouts and their aftermath, is the effect it has on our confidence. Yes we can cover with foundation and concealer, but really deep down everyone wants beautiful clear skin when they take their make up off too.

Finding products that genuinely make a difference, no matter how big or small has unmeasurable benefits to the way we feel about ourselves and I know how happy this product made me after just a few days, and I can't wait to keep on using it.

As far as I'm aware, this product isn't for long term use and is really for when the skin is playing up big time. However, I will be making sure I always have some of this handy in my makeup bag as it's really surprised me.

I have used so many products in the past in a vain attempt to get better looking skin, and I've even cut out certain food groups for months on end. I can honestly say nothing has had such a dramatic impact on my skin than Effaclar K, and I'm really impressed, especially as it hasn't aggravated my sensitive skin or dried it out.

Inside the box, there is also a leaflet explaining the different La Roche Posay products and when to use them according to your problem or concern. I love this attention to detail, as skincare can be overwhelming, especially when you are looking to fix a problem and have been let down by so many other products in the past.

Of course, everyones skin is different and as I have said before "similar to a mathematical formula", therefore finding what works for you is often a personal and unique thing so this should be something you bear in mind. Interestingly, this moisturiser states it's for oily skin (there wasn't another option for my skin type) as mine is actually dry/sensitive. I was worried this could cause me problems but it genuinely hasn't, so don't be put off if like me, your skin isn't oily. 

Overall, I feel this product definitely is worthy of "Holy Grail" status - something I was saying after just a weeks worth of use. I've had barely any more problems since using this moisturiser, and my skin continues to get better and better with each use.

For £9.75, you can do alot worse, believe me! 

Effaclar is available in Boots stores as well as online 


Sunday, 17 November 2013

Pale Skin Dark Lips


It's getting to that time of the year when hot chocolate is the order of the day, and central heating is my new best friend. Whilst we may be comfortable switching up our wardrobes with darker tones as we head into the colder months, what about our make up choices too? 

A deep berry lip is becoming ever more acceptable, and although you may be scared to try it, *with the right balance of make up* it's actually alot more wearable than you may expect. It could also pair very nicely with the LBD this Christmas, as opposed to your typical red or nude lip.

You can also tie in the look by pairing similar coloured accessories and also nail polish. Barry M do an incredible range of deep berry shades at a very affordable £2.99. The high street is also filled with lots of key pieces that all feature berry tones, and it's a very workable colour that can be smart for work or glammed up for the evening.


My own take on this look focuses on three things - a dark lip, blacker-than-black lashes and strong (but not scouse!) brows. All of which is paired against a full, matte full coverage base.  

Prior to make up application, I used Liz Earle Cleanse and Polish followed by my Origins make a difference plus moisturiser, and finally my MUA primer. Remember to think of your skin like a wall you intend to paint - s'only going to go on smooth if you prep it first! (random but true). 

After prepping the skin, I applied foundation over the face and lips, using a Real Techniques Buffing Brush. This particular brush will ensure a smooth application, as opposed to the traditional foundation brush which can sometimes leave brush marks.


My base consisted of Mac Studio Sculpt Foundation in NC 15, mixed with Dainty Doll Liquid Foundation in 001. I have to custom mix all of my foundations as I'm sure you will understand, as nobody really caters for our skintone! However, Dainty Doll has now gone into administration so I would advise finding an alternative white foundation as your mixer, such as Illamasqua skin base in 01 or Mac Face & Body in White.  So long as you are able to mix the colour to your exact shade, that's all that matters! (not necessarily the brand name). Similarly, if you can't get hold of a Mac foundation, *any* full coverage foundation will do. 

A full coverage in this look is however essential - as we need to completely knock out any redness, as purple toned make up will only emphasise these areas if not. A flawless base will also help focus the attention on the lips, as this is the area of the face we want to stand out the most.

After foundation, I used Collection 2000 lasting perfection concealer in 01 fair, using the same brush I used for foundation to buff it into the skin. I didn't need too much of this as Studio Sculpt is quite full on, and tends to cancel out any imperfections on it's own. The main thing is to cancel out any redness, so check you have done this before moving onto the next step.


Now for the all important lip! As mentioned I applied foundation all over my face and lips to knock out my natural lip colour, and to act as a primer. I then applied the lipstick - Revlons's Black Cherry - using a Real Techniques detailer brush, painting from the lipstick onto my lips. Using this technique first, allows to get the shaping right and tweak where necessary. I then went over the entire lip with the actual lipstick, which gave it a much stronger look, as well as staying power. 

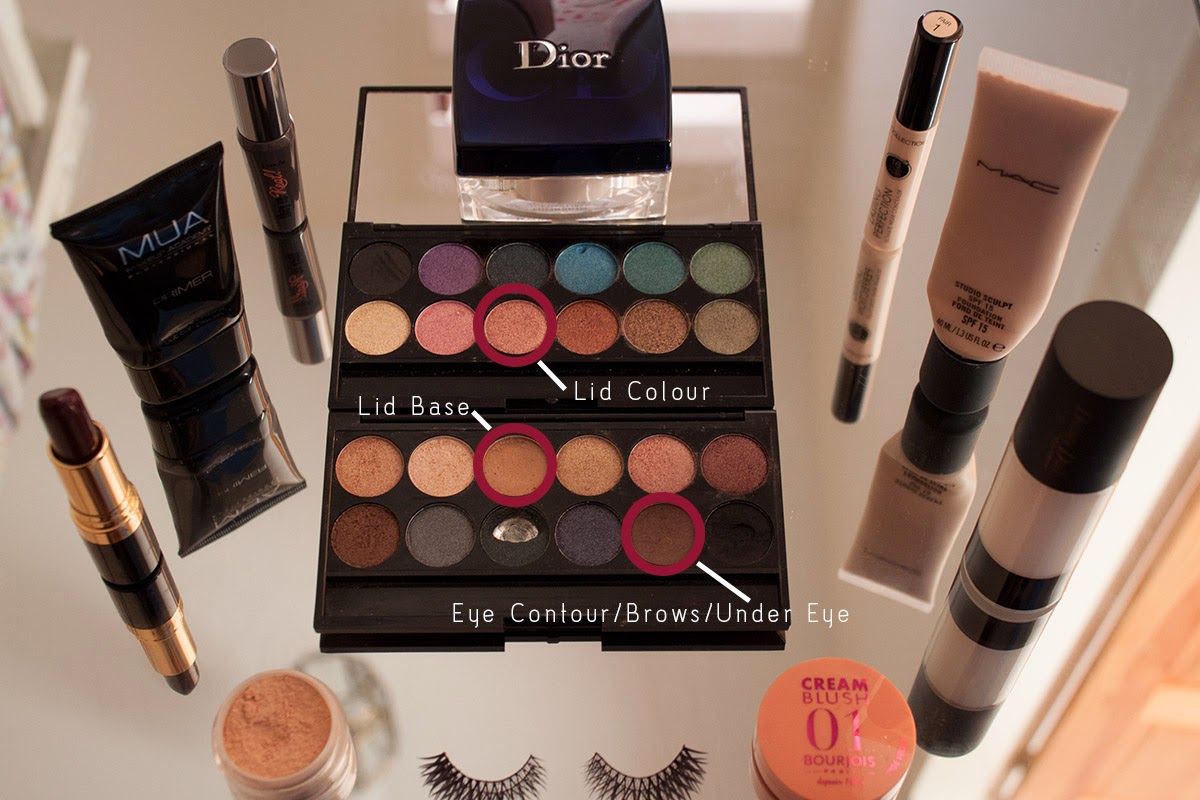
For the eyes, I used my Dior eyeshadow brush, and my Sleek eye contour brush. I used 3 colours from both Sleek's Storm and Original palettes, although you can get away with using just the 2 colours from Storm. I used the tan shade as a base, and the matt brown as a contour through the socket. I also used this shade through my brows, although you'll notice I only lightly filled in any sparse areas as I personally dislike a strong brow on myself. 

It's worth bearing in mind that a good shaped brow prior to make up application, will always make a huge difference, and will really open up the eye area. It's also worth investing in an eyebrow comb to tame the brows and brush them upwards to keep them in shape. 

To complete my eyes, I used the orangey shade from Original palette lightly over the top of the eyelid, and the matt brown underneath the eyes and blended this out with my blending brush. Finally, I applied some Benefit mascara, and placed some no7 lashes over the top.


I know some people would rather go naked in public than part with their kohl eyeliner, however brown eyeshadow is alot softer meaning your eyes are still defined, however the lip is allowed to be the main focus. The last thing you want with this look is both the eyes and the lips competing for attention, as it can end up looking far too much... so keep the eye liner soft!

For the finishing touches, I applied Bourjois cream blusher in 01 Nude Velvet to the apples of the cheeks. I then lightly applied Max Factor mineral foundation as a contour and Dior loose powder over any areas where concealer was used to set it in place. These last two steps however are optional, although I would always advise powdering any under eye concealer to prevent creasing. 

And voila! Now, I realise a bold lip aint gonna be everyones thang - however hopefully I've inspired some of you out there to experiment with your make up, afterall you only have one face and you only get one lifetime to show it off! 

Here's a birdseye view of all the products I used...  


Full Product List: Mac Studio Sculpt Foundation - NC15, Dainty Doll Liquid Foundation - 01, Max Factor Mineral Foundation - 40 Creamy Ivory (decanted in pic), Dior Loose Powder - 001, Collection 2000 Lasting Perfection Concealer - 01 Fair, MUA Primer, Bourjous Cream Blush - 01 Nude Velvet, Benefit "They're Real!" Mascara, Sleek Palette - Storm & Original, No7 "Day" Lashes & Revlon Lipstick - 477 Black Cherry. 

Let me know what you think of this look by leaving a comment or tweeting me @paleskinmakeup