Pages

Sunday 17 November 2013

Pale Skin Dark Lips


It's getting to that time of the year when hot chocolate is the order of the day, and central heating is my new best friend. Whilst we may be comfortable switching up our wardrobes with darker tones as we head into the colder months, what about our make up choices too? 

A deep berry lip is becoming ever more acceptable, and although you may be scared to try it, *with the right balance of make up* it's actually alot more wearable than you may expect. It could also pair very nicely with the LBD this Christmas, as opposed to your typical red or nude lip.

You can also tie in the look by pairing similar coloured accessories and also nail polish. Barry M do an incredible range of deep berry shades at a very affordable £2.99. The high street is also filled with lots of key pieces that all feature berry tones, and it's a very workable colour that can be smart for work or glammed up for the evening.


My own take on this look focuses on three things - a dark lip, blacker-than-black lashes and strong (but not scouse!) brows. All of which is paired against a full, matte full coverage base.  

Prior to make up application, I used Liz Earle Cleanse and Polish followed by my Origins make a difference plus moisturiser, and finally my MUA primer. Remember to think of your skin like a wall you intend to paint - s'only going to go on smooth if you prep it first! (random but true). 

After prepping the skin, I applied foundation over the face and lips, using a Real Techniques Buffing Brush. This particular brush will ensure a smooth application, as opposed to the traditional foundation brush which can sometimes leave brush marks.


My base consisted of Mac Studio Sculpt Foundation in NC 15, mixed with Dainty Doll Liquid Foundation in 001. I have to custom mix all of my foundations as I'm sure you will understand, as nobody really caters for our skintone! However, Dainty Doll has now gone into administration so I would advise finding an alternative white foundation as your mixer, such as Illamasqua skin base in 01 or Mac Face & Body in White.  So long as you are able to mix the colour to your exact shade, that's all that matters! (not necessarily the brand name). Similarly, if you can't get hold of a Mac foundation, *any* full coverage foundation will do. 

A full coverage in this look is however essential - as we need to completely knock out any redness, as purple toned make up will only emphasise these areas if not. A flawless base will also help focus the attention on the lips, as this is the area of the face we want to stand out the most.

After foundation, I used Collection 2000 lasting perfection concealer in 01 fair, using the same brush I used for foundation to buff it into the skin. I didn't need too much of this as Studio Sculpt is quite full on, and tends to cancel out any imperfections on it's own. The main thing is to cancel out any redness, so check you have done this before moving onto the next step.


Now for the all important lip! As mentioned I applied foundation all over my face and lips to knock out my natural lip colour, and to act as a primer. I then applied the lipstick - Revlons's Black Cherry - using a Real Techniques detailer brush, painting from the lipstick onto my lips. Using this technique first, allows to get the shaping right and tweak where necessary. I then went over the entire lip with the actual lipstick, which gave it a much stronger look, as well as staying power. 

For the eyes, I used my Dior eyeshadow brush, and my Sleek eye contour brush. I used 3 colours from both Sleek's Storm and Original palettes, although you can get away with using just the 2 colours from Storm. I used the tan shade as a base, and the matt brown as a contour through the socket. I also used this shade through my brows, although you'll notice I only lightly filled in any sparse areas as I personally dislike a strong brow on myself. 

It's worth bearing in mind that a good shaped brow prior to make up application, will always make a huge difference, and will really open up the eye area. It's also worth investing in an eyebrow comb to tame the brows and brush them upwards to keep them in shape. 

To complete my eyes, I used the orangey shade from Original palette lightly over the top of the eyelid, and the matt brown underneath the eyes and blended this out with my blending brush. Finally, I applied some Benefit mascara, and placed some no7 lashes over the top.


I know some people would rather go naked in public than part with their kohl eyeliner, however brown eyeshadow is alot softer meaning your eyes are still defined, however the lip is allowed to be the main focus. The last thing you want with this look is both the eyes and the lips competing for attention, as it can end up looking far too much... so keep the eye liner soft!

For the finishing touches, I applied Bourjois cream blusher in 01 Nude Velvet to the apples of the cheeks. I then lightly applied Max Factor mineral foundation as a contour and Dior loose powder over any areas where concealer was used to set it in place. These last two steps however are optional, although I would always advise powdering any under eye concealer to prevent creasing. 

And voila! Now, I realise a bold lip aint gonna be everyones thang - however hopefully I've inspired some of you out there to experiment with your make up, afterall you only have one face and you only get one lifetime to show it off! 

Here's a birdseye view of all the products I used...  


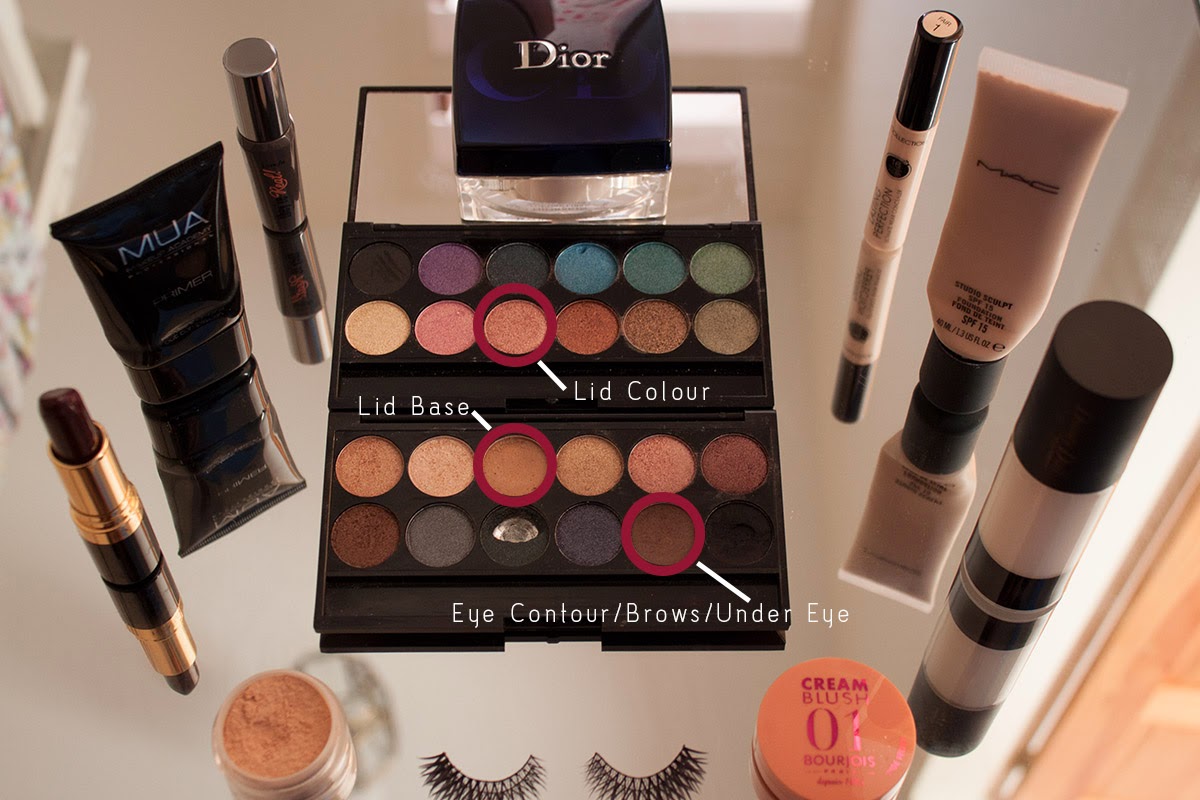
Full Product List: Mac Studio Sculpt Foundation - NC15, Dainty Doll Liquid Foundation - 01, Max Factor Mineral Foundation - 40 Creamy Ivory (decanted in pic), Dior Loose Powder - 001, Collection 2000 Lasting Perfection Concealer - 01 Fair, MUA Primer, Bourjous Cream Blush - 01 Nude Velvet, Benefit "They're Real!" Mascara, Sleek Palette - Storm & Original, No7 "Day" Lashes & Revlon Lipstick - 477 Black Cherry. 

Let me know what you think of this look by leaving a comment or tweeting me @paleskinmakeup 


Thursday 31 October 2013

October Favourites


I thought I'd start doing a monthly favourites, and what better month to begin with than October. It may not be especially spooky, but if you can imagine I'm writing this post sans make up I'm sure that's enough to terrify you into not even bothering with Halloween this year!

I think the transition between Summer and Autumn is the most harshest. All of a sudden you go from being able to walk around in shorts -  to suddenly needing 10 layers and the central heating on full blast, not to mention the cold dark nights that soon draw in! 

However, this is also a great time to switch things up with your make up and go much darker and heavier, and be bolder with your choices. 

These are some of the products I've been loving this month....
 

1. The Body Shop -Satsuma Shower Gel - £4/250ml
 

I have always loved this particular shower gel for Autumn, because it tricks the mind into feeling like it's still warm outside. It is also extremely powerful in filling the whole top floor of my house with the smell of Satsuma. The scent isn't synthetic or overbearing though, and is great at waking me up in the morning.

Recently, I've been pairing it with body scrub from the same range and both are to die for and don't irritate my sensitive skin. Give it a smell in the shop if you are not sure, just try not to fall over with delight....


2. MUA - Lipstick Shade 16 Nectar - £1/3.8g

Ok so I have been wearing this pretty much all through the end of summer, however it's been my shade of choice this month too! I would have never of gone for orangey/coral lipstick shades in the past, however I find for pale skin they are genuinely workable even into everyday looks. This lipstick is quite matte, yet doesn't dry the lips out and is surprisingly pigmented. For £1, it's at least worth a try!  


3. Dior - Diorshow Powder Blusher 005 - DC

This blusher is an old favourite of mine and unfortunately it seems it has now been discontinued, although some sellers are still selling this on ebay.

I like this blusher because although it seems quite deep, it actually goes on quite subtly, and is one of the only powder blushers I have ever truelly loved. I apply by using my Dior blusher brush with the powder in the bottom compartment that detaches from the main lid/applicator. 

It has never looked too dark/muddy on my skin even in winter when I am at my fairest. I do hope they bring it back because it's such a beautiful colour when applied.

(lid not photographed due to it being very reflective!) 


4. Marks & Spencer - Frankincense & Myrrh Candle - £3.50 

It's no secret in my house that I have a bit of a problem with all things Yankee candle related, and well all candles really! When I was younger, we had an M&S Christmas air freshener, and I've always longed for that smell since. This item was a bit of research before the Christmas sections get manic, and well it was quite a pleasant surprise.

We had this on in the living room last night for a couple of hours, and the smell genuinely lulled me into going to bed way before my normal bedtime. I slept for nearly 10 hours straight which is very unlike me! 

I don't think it's quite the same as the scent we had years ago, although it's definitely something I would re-purchase. The smell isn't overbearing or "headachey" as some heavier, musky scents can sometimes be. 

I'd actually rather have this candle than the turkey....


5. Mac - Studio Sculpt Foundation in NC15 - £25/40ml

Over the years I've had a bit of a love/hate relationship with this foundation. It transfers onto clothing like a mofo, is far too heavy for summer and is too dark for my skin so needs a white foundation adding everytime I want to use it. 

That being said, when lightened and used sparingly really blending it out, it's actually quite a good full coverage foundation. I almost always get told "my skin looks nice" even by my Brother who wouldn't notice if my hair was suddenly bright pink, so that's got to count for something. 

I've been wearing this foundation alot for important events/meetings/interviews, as I know it will even out my skin and work brilliantly as a base for other products to go on top. It is a bit heavy if you have a long day ahead, however if you are looking for full coverage, this will certainly give you it (also smells like Rum & Raisin ice cream!)


6. Thierry Mugler - Alien Eau De Parfum - £43/50ml

Again this one is a bit of an old favourite, however it's an October favourite as it's now cold enough for it to come out of hibernation.
I have previously done a review on this perfume as it is my signature scent and has been for a couple of years now.   

I have started wearing it again recently, and the other day a receptionist stopped me in my tracks and asked me what it was as she really liked it. This not the first time this has happened to me, as it's one of those scents you smell and then have to smell again.

It's also incredibly long lasting and powerful, so a little really does go along way. 


7. L'Oreal Elvive Extraordinary Oil - £9.99/100ml

Superdrug recently had this product on offer and I had to take advantage of it! As I've mentioned before, my hair is incredibly thick and therefore alot more difficult to manage than it may look. 

I like to have products through my hair whilst blow drying to help lock in the style, not to mention keep things smooth. I've been using a couple of pumps of this distributed through the mid lengths/ends, and so far I'm quite impressed. 

I'm not sure exactly what it does, although the smell radiates through my hair as the heat from the hairdryer comes into contact with it. My hair also feels pretty nice afterwards too. Doutzen Kroes, watch this space...


8. Barry M Nail Paint - 365 Berry Cosmo - £2.99/10ml 

A girl can never have too many dark, vampy nail polishes and October is the perfect month to get the ball rolling. Barry M seem to have moved from just doing very colourful products, to really moving with the trends and you can never go wrong with purple as the nights get colder. This shade is smart enough for the office, yet great for parties and would compliment a dark smokey eye perfectly.

If only I could find a new hand bag in this shade....


What products are you loving this autumn? Let me know below or tweet me @paleskinmakeup! 


Thursday 24 October 2013

London Calling (and it's make up counters!)


Where I live, we are literally hours from the likes of Mac, Laura Mercier and Bobbi Brown. This is why I always take the opportunity to visit Selfridges and some of the larger Boots/Superdrug stores whenever I'm in London, as they sell a much greater variety of brands than we have back home. 

I did intend to make this a much bigger haul, however I conveniently got ill over my trip, and even missed a family dinner thanks to my lovely sinuses. Anyway, I am really glad for the products I did manage to pick up at Selfridges, John Lewis, Superdrug and Topshop! I shall probably do a more in depth review of these products once I've used them enough, however if there is anything in particular you'd like to see a review on please leave me a comment below.

In no particular order....


1.  Bobbi Brown Tinted Moisturizer in Alabaster Tint - £29 (50ml)


I have just about run out of my Laura Mercier tinted moisturiser (sob!), and figured I may as well try a different one just to switch things up a bit. I was surprised to be told I am now "Alabaster" in Bobbi Brown, as it's got quite a pinky undertone although I personally feel this product is a little darker than "Alabaster" in the actual Bobbi Brown foundations.

The consistency/shade is also alot sheerer and lighter than it appears on my arm. Infact, when you blend it in it really does dissapear, alot more than a foundation would. Overall it's coverage is very light, so probably best saved for the days when my skin is behaving itself and I just want a natural look.

I did want to try the Moisturizing Balm, as Essie Button recommended it on her blog, although for some reason the counter assistant said this one would be better suited for me. I'll keep you posted!


2. Origins Make A Difference Plus Moisturizer - £34 (50ml)


My skin seems to have an automatic sensor that knows as soon as autumn kicks in, as it will automatically become super dry and dehydrated. I do love my Nivea moisturiser, however when the cold weather comes around I really do have to step things up to keep my skin from becoming tight and uncomfortable.


This was the only item I bought from Selfridges, as I have to admit although I'd been there before I was a little overwhelmed with the amount of people, and I really wasn't sure what counter to go for either! 

I have used Origins products before, and know they are highly regarded so this is what drew me to them. The lady recommended this for my dryness, and said they do a richer version but this could be too much for my skin and cause it to breakout. It has a very refreshing texture and sinks into the skin well, especially under make up so hopefully this will do the trick. 

3. MUA Colour Blast Eyeshadow Tint in Bring it Back - £3


If you had said to me a few years back would I be interested in brown eyeshadow, I would have given you a firm no. Since letting my hair colour grow out, I've suddenly found brown eyeshadow tones to be incredible easy to work with, and it's a colour that genuinely compliments pale skin tones as opposed to standing out too much or being too harsh, like some shades can be.

I became interested in the MUA eyeshadow tints, as I think they are very similar to the Clinique Chubby Sticks (and at a fraction of the price!) 

There are 6 shades to choose from, and I love that the formula is quite creamy and blendable, as well as buildable. I think this works best if you use some similar/neutral coloured eyeshadow underneath as a base to really make the colour pop. I think I'm going to get alot of wear out of this product!


4. Revlon Nail Art Moon Candy in 280 Orbit - £7.99


It was love at first sight when I first glanced over these in a recent edition of American Elle Magazine.  If you have seen my nail shelf, you will know I am really into my polishes, especially any special effects that can be layered over the top!

Out of all the shades and combinations available, I liked 280 Orbit the best as it looked the most wearable, not to mention eye catching. I do think at £8 it is a little pricey for a high street nail polish, so hopefully it will live up to the expectation (although I guess you are getting two shades for the price of one!) 


5. Topshop Nail Polish in Razzmatazz - £6


The beauty area on the ground level of Topshop Oxford Circus is truelly incredible, and even sells high end make up brands as well as it's very own Topshop line. I did manage to photograph a tiny amount of what is there (the nail shelf extended way beyond my lense could)... and frankly it was impossible to choose from!

I chose Razzmatazz, because of the way it looked under the shop lights as the way it sparkled really stood out for me. I quickly tested it over Essie's Mint Candy Apple, which is more of a spring/summer shade. The beauty of Razzmatazz is, it literally made MCA look like Christmas wrapping paper, meaning you can still wear your summery shades in autumn/winter too. Perfect!

I will return to Topshop for the other 15 shades I made myself put back....  

Monday 21 October 2013

I Whipped Ma Hurr Into Hershesons...


As someone who has deceptively thick hair, taking care of my locks when I go away can be a bit of a challenge. Firstly, I *have* to completely blow dry my hair thoroughly after washing it, using a concentrated nozzle and a barrel brush to smooth it out. Otherwise, it will not dry for hours/gladly impersonate Wurzel Gummage. Washing and styling is fine at home, but becoming a make-shift mobile hairdresser when you have limited space in your weekend bag, can be a bit of a nightmare. 

This is where Hershesons Blow Dry Bar comes in, at £25 for a wash and finish. Conveniently located in Topshop Oxford Circus (as well as a few other London locations) it's the perfect solution to avoid bad hair/loads of hassle, when you are away for the weekend in the capital, or just fancy a treat.

To use the service, you simply book online, choosing both the time and day of your choice, as well as preferred stylist if you have one. 

When you turn up on the day, the first thing you do is choose one of 12 styles pictured on the wall for the stylist to re-create for you. I went for the half & half (after first asking if I could have them all hehe). There are a real mix of experimental/on trend styles, as well as a couple of updo looks to choose from. It is definitely in-keeping with the Topshop environment, although I feel there is a style to suit everyone, as they are each quite individual.


Once you've chosen your look, next comes the obvious washing part (
using Kérastase products no less!) I have to admit at first it was a bit strange having my hair washed in the middle of Topshop's flagship store. The store itself was understandably heaving what with it being a Saturday, although the Hershesons salon offered a little private sanctuary from all the madness (even if it does face one of the escalators!) 

My stylist was fairly thorough yet gentle when washing, (which is a relief because some hairdressers treat my scalp like they are sanding a floor with their nails).... Afterwards, she patted my hair dry with a piece of cotton like material to dry off the excess, before moving me over to one of the sleek salon chairs. 

Before going in with the Hershesons own brand hairdryer and brushes, my stylist applied some Kérastase Bain De Force throughout. My hair was then rough dried without a nozzle, before the nozzle was then applied and a small barrel brush was used on individual sections of my hair. Each section was wrapped around the brush, and my stylist went over each section with the hairdryer, giving it volume and lift. After each section was completed, it was pinned into a curl and secured using a metal clip.

After my hair was all dried and pinned, my hair was sprayed with Elnett and left to cool for a couple of minutes. The clips were then taken out, and I was told to tilt my head back as my stylist ran her hands through all the curls to make it look a little less "done". Then, my look was complete and all was left to do was pay. 


As you can see I then took a shameless selfie in one of the mirrors in Topshop as soon as I got out. I was really happy with the finished look, as I was feeling a little unwell that day with sinus pain (hence the face - sorry!), and was dreading having my hair done incase it made me feel worse. Surprisingly, the experience genuinely took my mind of it for a little while and made me feel a little better. I was also releaved that I didn't have to head back and wash my hair at the end of the day for once! 

The only negative thing about my experience, was they seemed to use the dryers on full heat which felt a bit too hot when the dryer came too close to my scalp. I know I have quite sensitive skin, so this could just be me but it's worth bearing in mind that this is a quick turn around service, and if you have very thick hair like me, they have to get through it very quickly in order to be able style it. I can understand why, but it was a little uncomfortable at the time. Nevertheless, it was mostly a very positive experience, and it hasn't put me off returning, as the pros well outweigh the cons for me!

I also want to thank my stylist (I'm sorry I didn't catch your name!) for being so kind as to let me photograph the salon for this blog, as well as giving me a magazine with all the styles to take away with me for my Cousin, as we are looking at getting some treatments done in London for her birthday. 

For £25, I think you definitely get your money's worth in the products used and styling tools alone. Although the curly ends did drop as the day progressed, it still looked like my hair had been done professionally, and was definitely alot neater than the bun I had left the house in. 

Overall, it was a great experience and I will be sure to return as it's definitely a huge convenience, with some very talented staff at it's helm. There are also some other styles you can have done that involve clip in extensions - meaning no matter your hair length or style preference, there's sure to be something you can enjoy at Hershesons.


To find out more and to book, check out the Hershesons website.  


Tuesday 1 October 2013

Nailin' It


Autumn is the time not just to pull out the knitwear, but also the deeper nail shades too. Whilst I have reviewed a couple of the polishes pictured above before on my blog, I think this is the best time of the year to really showcase them. 

Pastels are also a growing trend for nails (and indeed coats!)... although I am yet to venture into this myself. The colours everyone seem to be raving about, are pastel blue and pinks. 

For now, I am playing it safe with my chocolately, purplely and general all round "autumny" shades.  The great thing about these shades though, is because they are not super dark and actually have a bit of warmth in them, this means they are fairly wearable on pale skin. 

A great way to test if a nail colour is suitable for your skintone, is to hold the bottle against your hand or arm in the shop (providing the lighting is fairly natural). If you feel the colour washes you out, simply go for one shade lighter and see how you get on. Remember, the darker the shade... the more difficult it is to pull off (not that it can't be done!)

Let me know in the comments section or on twitter @paleskinmakeup if you have any nail colour suggestions for me this season!

Sunday 22 September 2013

Roulade Anyone?!


I decided to bring y'all something a little different on my blog today, in the form of a Chocolate Raspberry Roulade recipe. I saw this being demonstrated on TV by chef James Tanner, and had to give it a go! 


What I like about this recipe, is it's fairly simple.... nothing over complicated. Best of all, it's chocolately so really you can't go wrong! I made this to take to my Auntie's as we were having Sunday lunch there, so this was for dessert.

Below is some step by step pictures, followed by the method and ingredients list. There are some things you can do in advance to speed things along, such as pre-grease and line your tray, as well as making sure you have a clean tea towel to hand for rolling. I did find the rolling quite tricky, however it doesn't matter if it goes a bit wrong.... infact I think it just adds to the messiness that makes it look so appetising! The beauty about this dish is that it doesn't have to perfectly neat, so try to take it easy.

I also whisked both the egg whites and yolks by hand as we don't have an electric whisk - this added to the time of making it, so if you are not an appliance techniphobe like in my house, it will be much easier. 

If you do happen to have a go at this recipe, please leave me a comment or tweet me @paleskinmakeup .... I'd love to see your attempt!  

Hopefully none of you will mind that I posted a recipe, afterall it's good to switch things up. Normal service will be resumed shortly, I promise. 


RECIPE:

Ingredients:

200g raspberries
6 free-range eggs, separated
250g icing sugar, sifted
25g (4 tbsp) cornflour, sifted
100g cocoa powder, sifted
Butter, for greasing
Flour, for dusting
300ml whipping cream, whipped
Fresh mint leaves, to decorate


Method:

1. Preheat the oven to 180C (350F).

2. Press half of the raspberries through a sieve or puree in a blender to make a smooth sauce (If blending, press through a sieve afterwards to remove the seeds)

3. In a mixing bowl, whisk the egg yolks with half of the icing sugar until light and fluffy.

4. In a separate bowl, whisk the egg whites until they form soft peaks then gradually add the remaining sugar and whisk until stiff.

5. Stir the two egg mixtures together using a metal spoon. Add the cornflour and cocoa powder and fold until combined.

6. Line a 26cm (10 ½ in) x 24cm (9 ½ in) baking tray with baking parchment, then grease lightly with butter and dust with flour.

 
7. Spread the roulade mixture in an even layer, about 1cm ( ½ in) thick, to cover the base of the tray.

8. Bake for 8-12 minutes until risen and the mixture springs back when pressed - do not worry if it feels slighty soft.

9. Turn the roulade out on to a clean, damp tea towel; carefully remove the paper and neatly trim the edges. Allow the roulade to cool slightly. Smear the raspberry sauce (setting some aside to serve) over the roulade, then top with the whipped cream and level with a palette knife. Scatter the raspberries (setting some aside to serve) over the cream.

10. Very carefully, from the short end, roll up the roulade using the damp tea towel as a guide. Leave the roulade wrapped in the tea towel and set aside to chill in the fridge.

11. When you are ready to serve, carefully remove the tea towel and the dust roulade with additional cocoa powder and slice on the diagonal.


12. Serve with the reserved raspberries and raspberry sauce, and decorate with fresh mint.


Monday 9 September 2013

My Daily Skincare Regime


There is alot to be said for taking care of your one and only face. I am of course no skincare expert, however, I love watching others talk about their routines on youtube, and it's something that fascinates me. So today, I thought I'd share mine with you.

I think finding what works for your skin, is comparable to solving a mathematical formula: it takes time, research and definitely alot of trial and error. I'm not saying my skin is perfect, however it's definitely the best it's been for a long time, and I believe that amongst watching my diet, stress and other factors.... the skincare I use has played a massive part in this.

Reading the product ingredients is something very important to me, and it's something not enough people do. For me, I avoid anything that's not oil free like the plague... although I do allow some natural oils but with caution. Any perfumed/harsh products also don't make the cut with me. 

I almost never ever use a face scrub either. My skin is quite dry/sensitive, and over scrubbing skin with an exfoliant is one of the worst things you can do to make this problem worse. No matter how frustrated you are with your skin, being harsh with it is never the answer, trust me.

Finally, if you do suffer from any kind of skin complaint or just want to clue yourself up more on your own skin needs, I can't recommend Caroline Hiron's blog enough. I think it's easy to fall into the trap of thinking the most advertised product on tv/magazines will answer all your prayers and clear your skin and make it look A-M-A-Z-I-N-G, but it's often not the case. It's not about spending the Earth or going overboard either, it's really about listening to your skins needs and treating it with care, afterall you only get one face! 

I'm not saying my skincare regime will always stay exactly the same, but for now these are the products I am loving the most...


1. Liz Earle Cleanse and Polish - Hot Cloth Cleanser

  
I recently did a post on this which you can see here for more details. In short, I love this cleanser because it's like a facial in a tube. Make-up remover alone will not fully cleanse your skin and remove all traces of daily grime, pollution, mascara traces etc.... so a good cleanser is essential for everyone. 

This cleanser is one I have bought time and time again, as it contains no nasty ingredients, and doesn't irritate my skin. It comes hand in hand with the supplied Muslin Cloths, in which I use to remove the cleanser and any masks/treatments I may use.


2. Garnier Essentials Make Up Remover 


I am a little less faithful with make up removers, I tend to prefer this one and the L'Oreal cleansing milk. I do however buy the Garnier one quite reguarly, as it just melts away my foundation. I find it really easy to work with, and best of all it doesn't try out my skin. Simply shake together before use, for one unified liquid and apply all over the face.


3. Sanctuary 5 Minute Thermal Detox Mask 


This is a very clever mask... for starters it heats up once it is exposed to oxygen, so as you apply it on the skin it warms your whole face. Products that heat up are great for getting deep into pores, because they help open them up... giving a similar effect to when you "steam" the face during a facial. It doesn't get too hot or burn though, so it is very safe and effective to use on the face.

I use this product once a week, and use my Muslin Cloth soaked in warm water to remove all traces. I then finish off with some of my Liz Earle Cleanser afterwards, to ensure all traces of the mask have been cleaned off.


4. Rose & Almond Vaseline


A bit of a controversial choice, as some argue Vaseline dries out the lips, however I have been using this Rose & Almond flavour for years now. This is a great product for those days when you don't want to wear a lipstick, yet hate bear lips and at the same time hate lip balms. The smell will bowl you over, and of course the little tin is perfect for even the smallest handbags!

 
5. Nivea Oil Free Moisturiser


Strangely, this variety is for oily skin types and my skin is dry/sensitive. However, I find the richer version too rich for my skin, and the normal version doesn't sink into my skin at all and makes my make up sit terribly. The green version however, sinks in beautifully and works really well underneath my primer. It's not too heavy, and being oil free will not cause breakouts. 

I find this is often the cheapest of the 3 varieties too, even though this is what works the best!

 
6. Antipodes Kiwi Seed Oil Eye Cream 
Fresh from New Zealand, I first found out about the Antipodes range after seeing a video by Essiebutton. I feel an eye cream is very important, as I want to prevent wrinkles and dark circles in the future as much as possible. As the eye area is also extremely delicate, it's important to use products that specify they are for the eye area.

I keep this product in the fridge, and delicately apply it at least once a day. It sits really great under concealer, providing you don't cake it on. One of the great things about this cream, is the first time you use it you do feel a tightening, and there is a visible difference when I look in the mirror.


7 - Hydraluron  

Hydraluron is the newest addition to my skincare regime, and is a product to be used after cleansing but before moisturiser. It claims that it "Increases skin hydration from below the surface, with an ultra-high quality hydraluronic acid, that holds up to 1,000 times it's weight in water".

I'm only a week into using Hydraluron, but I have already noticed a difference in my overall skin hyrdration... particularly in regards to how soft it feels. It has a clear gel like formula, and sinks very easily into the skin, although works best if you don't over apply it.

I shall keep you posted with my progress, but so far I am quite impressed. 


Friday 6 September 2013

Nail Yourself A Bargain!


I check the Selfridges beauty page more times than most people check their mail... yes it's true I have an obsession at looking at all the beautiful, expensive products that have just come into stock. I noticed a few weeks ago, a brand new shade of nail polish by Chanel, in this wonderful Mermaid-Esque shimmery green colour, number 531 to be precise.  I loved the colour, just not the price. So, imagine my delight at seeing an almost identical replica in Tesco the other day entitled "Bongo Beat", for just £1.49. It made for a slightly alternative version to the Tesco meal deal that I usually go for, but one could argue the goods were much tastier. 

I applied this polish the same day, and after 4 days it still shows no sign of chipping, despite me not adding a topcoat. You would think that because it's a "cheap" nail polish, that it would go on in a similar fashion, but honestly it couldn't be any different... the polish has a wonderful shimmery-yet-not-glittery effect to it, and the texture is quite creamy, similar to polish I have tried from Bobbi Brown. I also noticed it was fairly quick to dry, and any additional coats went on really smoothly.

For over a £21 saving (I don't live anywhere near a Chanel/Selfridges counter so would have to pay the postage)... I think the Collection 2000 version is excellent, so good infact that it makes me realise just how ridiculous the Chanel price is, even though I'm sure it's wonderful too.  I do like my high end make up, however why pay more if the high street brands can pack just as good a punch?

Finally, in terms of pale skin this is a great autumnal colour, and I think it would suit redheads brilliantly. It's not a dark, flat colour... and yet it's not too sparkly for daytime wear. Give it a try!